Sunday 30 December 2012

Picking our Veg for our Christmas Feast!

This year for our Christmas Feast we decided to use as many vegetables as we could from Helen's Bay Community Garden. Not only were they free, except for the work and effort we put into them, but they also taste that much better because they are so incredibly fresh and were grown in a mineral rich soil. 

On the first few pictures you can see that we're in the polytunnel, harvesting the remains of our fennel crop, some swiss chard and one tiny turnip! 


Now most of the crop had been picked beforehand and there wasn't much left in the polytunnel for christmas, but we will try to be better organized next year and have more things growing in the winter, especially winter greens like spinach and rocket. But at least we had some lovely fennel and swiss chard for our Christmas Duck. And one turnip...
However, in the fields the situation was quite different as there were many brussels sprouts to pick. Brussels Sprouts are incredibly important to us, not just for Christmas and because it's tradition, but more because they're such an amazing vegetable. They're easier to grow than regular cabbages and we find them a lot more versatile to cook with. It's always such a great feeling to pick the fat and glorious sprouts which look like green gems growing on a miniature tree. 
And then at the top of the cane, as the sprouts get smaller, you get these tiny little sprouts which we use like peas and are just so sweet and tasty and look beautiful in every dish. Finally, on the top of the plant you get the crown, a small cabbage or a big brussels sprout, depending on your point of view! We cook this part like cabbage, often slow cooked and with bacon and onions. Hmmm, so good! You can see AC in the picture below holding one of the tops.
Anyway, we think that brussels sprouts should be eaten not only for Christmas, but during the whole period from November to January when they're in season. We always find them such a versatile ingredient, as we use them in curries, ramen soups, Italian pasta dishes....the list could go on and on. They're a very healthy veg too and contain many minerals, and they are great in soups for those health conscious readers among you!
Picking our own veg for our Christmas feast was a real joy, a break from buying presents and seeing relatives, just enjoying ourselves in nature and foraging the fruits of our labour. What more could you want!? And I think we all learned that we should grow more and eat more brussels sprouts, in many different ways, and appreciate them for the great little veggies that they are.


Saturday 22 December 2012

Oca - The Peruvian Wondercrop

Now here's quite an unusual plant that most of you have never heard of probably, but I think is really worth mentioning, at least to people who are interested in growing veg. Oca is a plant that produces underground tubers, just like potatoes, but it's an incredibly vigorous and resilient plant that isn't really bothered by pests or diseases, unlike potatoes which are often affected. The plant grows similarly to potatoes and the Incas apparently used to grow both crops next to each other, as staple crops for their annual diet. Just like potatoes, Oca stores exceptionally well. But Oca is a far later crop than potatoes, often only ready in late November or early December, depending on local conditions. And Oca are not too fond of early frosts, they need the dark light levels of late autumn to produce their tubers and the longer you wait the fatter your Oca gets. You should really harvest them 1-2 weeks after the first frosts have hit the plants. It's quite extraordinary really, when the first frost hits the plant the lush green foliage of the plants starts wilting and dying down immediately. That's when the remaining energy of the plant 
is used to fatten the Oca.

As you can see on the picture to the left, Oca plants form very effective ground cover. The picture was taken at Helen's Bay Community Garden, and the three tires in front of the raised beds contain Oca plants. The tire on the left shows an Oca plant in its early stages and the other two are in intermediate stages. The plant produces a lot of foliage over its lifetime and produces many small flowers. It's really a non-fuss plant to grow and it stays happy during its entire cycle. Oca tubers are normally chitted like potatoes before planting, meaning that the tubers are taken out of their dark storage in March/April and put into daylight so that new growing buds can form well. Oca Tubers should be planted at the latest in April because the plants profit from a long growing season, and if you want to use the plants as ground cover in especially weedy patches of your garden or allotment then it makes sense to get them in the ground as soon as possible. 

And this what the actual thing looks like when uprooted. The variety we planted this year are scarlet and white and when pulled out of the ground are incredibly dark red, or scarlet. As with potatoes, it's incredibly satisfying to dig up Oca, it's like finding hidden treasure in the ground. It really gets you excited like a kid, and our harvest was quite plentiful so there are plenty of tubers to dig up when grown properly. What's also unusual with Oca is that unlike potatoes, they can be eaten raw. Actually it seems that the whole plant is edible and in the Andes the tender leaves and young shoots of the plant are eaten as greens. And what makes them so nice I find is their timing. Because potatoes are a summer/autumn crop depending on your variety and where you live, I love the fact that Oca is harvested in late autumn and early winter. That's probably a reason why they were so important in the Inca crop rotation. And even though Oca can be very much prepared and cooked like potatoes, they really shouldn't be used as a replacement to potatoes. They are two completely different crops, and actually they are very nice combined in a dish, such as a gratin. 

They do become quite pale though when cooked and lose much of their brilliant colour. Below on the left you can see an Oca tuber when sliced in half, and as you can tell they are not incredibly huge. Now they won't grow that much bigger than that and so are not like spuds which can get absolutely ginormous! So Oca tubers stay quite small, and when cooked have a very interesting taste and consistency. They are very creamy, like a mash almost, or a combination between a potato mash and a radish puree. And the taste when cooked goes into the direction of potato, but steers off slightly through its tangy, almost sorrel like flavour. This tangy or slightly sour flavour is also present when eaten raw. I vividly remember the first Oca I tasted, and it was quite different. They do taste slightly odd at first, especially when tasted unadulterated. They are really a combination of flavours, of known flavours, but also slightly unknown. You can't really put your thumb on it. Indeed most people give slightly different descriptions of the flavour. Oca is very crunchy raw, just like a nice crisp radish, and the first flavours are almost opposing. There is that sweetness which comes from the colourful middle, that almost tastes like fruit or strawberries in my opinion (most people differ on what fruit it's supposed to be). But simoltaneously there is a savoury flavour, almost salty in a way, but not really. A deep savoury flavour is the best I can describe it as. And then there is the tangy or sorrel like aftertaste. All in all this may not sound appealing, but it's well worth trying as it is one of the more unusual taste experiences you will have in your life!

But this oddness of flavour is transformed into refreshing crunch and delicate flavour when Oca is used in a salad or is dressed nicely in whatever way you fancy. A bit of acidity and some nice oil, and also  a bit of spice, gives the humble Oca a fancy makeover and thus becomes a welcome change to the usual winter diet of hearty stews and roasted vegetables. That is really one of the reasons why I welcome Oca so much, because it is so crunchy and refreshing at that time of the year and lends itself perfectly to salads. It's also a very healthy vegetable when cooked raw as it is an important source of vitamin C, potassium and iron. So no wonder that Oca is still a crop that many subsistance farmers in the Andes rely on.


Although this account of the humble Oca has been quite long and in full detail, I think it is well deserved because it is such an unusual food, very interesting in flavour both cooked and raw, very attractive looking indeed, very healthy to eat too and a joy to grow in the garden! What more could you want?! And the festive colour of the Oca also works for Christmas...perhaps at some point it will become the new seasonal food. Forget pomegranate, forget brussel sprouts, just eat Oca!

If you want to know where to get hold of Oca tubers for planting then the realseed catalogue is the place to go! They also offer more information on planting etc.


Saturday 1 December 2012

Perfect Breakfast Rolls, ready in time for breakfast!

Here's our latest bread video, and we really like this one. Everybody likes good warm breakfast rolls in the morning, but a lot of people think that you would have to get up at 4 in the morning to make them for breakfast! Well with our technique it will only take you 30 minutes to get your rolls ready for breakfast, and if you have an oven that you can set for a certain time then it will really only take you 10 minutes in the morning! For fresh breakfast rolls! I think that's pretty good. The trick is really to do all your prep the night before. So the dough is prepared, mixed, kneaded, risen and then you shape your rolls and coat them in a variety of seeds that you like. Then you just cover them with a kitchen towel and put them in the fridge to double in size overnight. Now this is really only possible because we've prepared the dough properly and because we're using good quality white bread flour. White bread flour reacts very quickly to yeast, and even though you're normally recommended to let your bread dough rise in a warm environment it's ok to leave the rolls in the fridge overnight. The yeast reaction doesn't stop in the fridge, it's just very slow, but steady and thus ready in the morning. Now we haven't tried this recipe with other types of bread flour, like wholemeal etc, but I suspect that it will work to a certain degree but not as well as the white bread flour. We this technique is really a winner and possible for everybody! It's simple enough and not too much work, and if you can't try it during the week, it will surely be an amazing recipe for a lazy weekend breakfast or brunch. So do give these rolls a go and we hope you enjoy the video :)


Thursday 29 November 2012

Swiss Chard and Goats Cheese Quiche (using Soy Cream)

Yup it's time for another seasonal recipe, and this time we're focusing on beautiful Swiss Chard. Swiss Chard comes in different colours and looks absolutely incredible. It's also incredibly tasty, very much like spinach, but even better in my book. It's also very easy to grow and is a nice source of fresh greens at this time of the year. It brings colour, texture and freshness to the winter diet and it's very good used in a quiche. And quiches are so very easy to make, the pastry of course can be bought in most supermarkets and then you can choose whatever seasonal ingredients are available, and we often also use leftovers in it. Even though a quiche is normally made with ordinary cream, we're using Soy Cream for this recipe. One reason being that I myself have a cow's milk intolerance, so I can't use ordinary creeam that often. But I do love a good quiche and was looking for a cream substitute and have used Alpro Soy Cream for this recipe, which is very versatile, easy to use and it keeps very long in the fridge. The texture of this quiche is a bit more eggy, you could only use 2 instead of 3 eggs if you prefer your quiche being creamy. All in all it's a very easy and versatile recipe, perfect for customising. And do consider using soy cream, as it is perfect for people who are lactose intolerant and such, but it's just a nice ingredient in general.

Thanks for watching!!!


Saturday 24 November 2012

European Week for Waste Reduction in Belfast


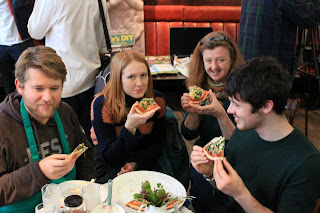
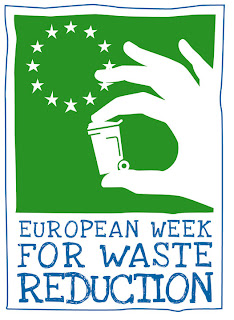
AC and I were part of Root & Branch Organic's commitment to waste reduction this Thursday, as part of the European Week for Waste Reduction. We set up a stall in the Black Box in Belfast and offered organic smoothies made with 'waste products' from Helen's Bay Organic Gardens.Pretty much every food business produces waste, and even though Helen's Bay Organic Gardens compost their waste it is of course nicer when perfectly edible produce is eaten and apprecitaed by people. The smoothies were really delicious and it's such an easy thing to do with over-ripe fruit and veg. All in all the event was really fun, we had lots of delicious 'waste' food and we met many interesting people!


The big message however should really be that we all should take a moment and think how we can reduce waste, especially at home. We met two people from Belfast City Council and had a really interesting talk about waste managment. Whether you might think or not, Belfast City Council like many other councils are actually very keen for people to recycle more. Not only is it better for the environment and local waste reduction helps meet European standards, but there is also a huge difference in cost between getting rid of normal waste or recycled waste. A ton of normal waste costs the City Council about £80, whereas a ton of recycled waste only costs £8! And even your waste from brown bins comes to a cost of around £43 per ton, so still a lot cheaper. The Council thus wastes millions of pounds every year because people don't use their blue and brown bins enough, but just chuck everything into their black bins.


Of course we wouldn't be telling people how to, if we didn't do it ourselves, so we'll tell you how we reduce waste and recycle at home, and hopefully these ideas will make you think about your own waste  and how to reduce it.

1) Every organic matter is pretty much composted in our house. We have two compost bins in our garden, so fresh kitchen waste from fruit and veg usually goes in there, mixed with cardboard from egg boxes and waste from the garden to create a balanced compost. And then for any cooked food waste and animal products, we use the City Council food bin, which then goes into the brown bin and then gets turned into compost as well. This is a really good second option for us because we can't put cooked food or animal products into our normal compost bins as it would attract pests and might even create harmful bacteria.

2) Paper and cardboard is either recycled by putting it into the blue bin, or because we have a wood burner we often just use it to start the fire. Anything else that can go into the blue bin also goes in.

3) For anything else that can be recycled, like glass, drink cartons etc, we're quite lucky because our recycling center is just down the road from us. We tend to just have 2-3 small boxes in our yard that we take to the recycling center every two weeks and that only really takes 20 minutes of our time. What is really important is to break the habit of just putting everything in the bin. Check what you can recycle at your local recycling center and many forms of packaging will tell you whether it's recycable or not. So now whenever we have something that can be recycled we just throw into one of our boxes, easy peasy. It really doesn't take up anymore time than just throwing it in your bin. You just have to make that initial thought and break the habit.

4) Old clothes, books, gifts and whatever else can often be given to recycling centres who then send it on to charitable organisations, or you can go straight to a charity shop of your choice and give unwanted items which other people might want. This is not only good for waste reduction but also for the charity shops who can thus make money for their charity. And don't be afraid to give torn clothes and old fabrics as these are sent on to companies who use it for compost.

5) What to do with plastic bags? Well for a start we use reusable bags so that we don't get that many plastic bags, but of course we still end up with our fair share. For the most part, we reuse plastic bags as bin bags. For us this makes perfect sense because we don't produce that much waste that goes into our normal bin and most of it is really plastic packaging, which unfortunatelly is not being recycled in many countries, even though it could be used for making bio-diesel. But plastic bags can also be used for all kinds of craft projects. Plastic actually makes for really good stuffing in handmade teddybears, pillows, you name it, as long as it's clean and dry obviously.

So this is how we reduce our waste at home, and we think that probably over 80 % of our waste is in some way or another reused, composted or recycled. The only waste we really have is loose plastics like wrappers and packaging, which could be used for better things besides landfill where it doesn't really decompose at all.

We hope that by reading this guide to waste reduction at home you might get a few ideas that change your approach to waste. As I've mentioned, most of the work is really that initial thought of how you can change your approach and then it's really just all about getting yourself organised and breaking the habit of throwing everything into the bin. It really doesn't take up that much of your time, especially whenever it becomes part of your daily routine. But of course all these suggestions should really work for you or else you can make them work according to your lifestyle. And obviously these things just take time, as it did for us, to find the perfect solution. However, we are confident that anyone can, if they want to, reduce their waste enormously. Even if it's not to the extent that we do it, it's always good to try anyway and not too feel bad about what you waste but feel good about what you save!

So let's all become a bit more conscious about what happens to our waste, which in the end is good for the environment and for us all who have to pay the taxes to get rid of the stuff!


Friday 23 November 2012

Red Velvet Inspired Cake (with Beetroot)

Now this recipe is really cool! You may have heard of Red Velvet Cake before. It's quite famous in America and it's is said to be from New York, although some people say it's a classic recipe from New Orleans. Anyhow, whenever we saw most video recipes we thought that it's not actually a very spectacular cake. It's basically a nice vanilla sponge with a tiny amount of cocoa powder and food colouring, which seems to be the real reason for the cake's popularity. We instantly thought that we should change the recipe a bit and that we should substitute the food colouring. A lot of people don't like using food colouring because it is essentially made out of crushed beetles and some people are even
allergic to it. The substitute for this problem was an absolute no-brainer because we use it all the time in the kitchen: fresh beetroot! Really good fresh beetroot is incredibly sweet and very versatile to cook with, and it dyes everything dark red! It also adds a depth of flavour to the cake and adds moisture and texture, which makes it similar to carrot cake. And it goes so well with chocolate! We added a lot more cocoa powder to the cake, and it simply tastes amazing, almost like a really good browny, but with the added flavour of the beetroot and the vanilla. And having made an effort with the actual batter, we just couldn't make a usual buttercream frosting. Instead we made an incredible white chocolate frosting which tastes like the most amazing vanilla ice cream! And together, the cake and the icing are a real experience! The flavours and textures compliment each other so well.

If you like Red Velvet Cake, then try this recipe, and if you don't like Red Velvet Cake, then even more reason to try this recipe! Honestly, we should all be making more of this cake, it's that good...


Thursday 22 November 2012

Thank you!


The title says it all: Thank you! Thank you to all our subscribers and our viewers, we hope you enjoy our videos and that you appreciate our hard work. The videos are fun to make and we love to read your comments! We obviously hope to grow in the future and to get more subscribers and more views so we can share our recipes and our ideas with even more people!
Thank you for your support and please keep watching!

Thursday 8 November 2012

Hugh's 3 Good Things Challenge: Beetroot Pesto

We're really excited about this video, obviously because this is a recipe we love and want to share with as many people as we can, but this is also our entry video to Hugh's 3 Good Things Challenge. Hugh Fearnley-Whittingstall, who's famous for his River Cottage programs and his approach to Slow Food and sustainability, has recently started a new show called Hugh's 3 Good Things. In this program Hugh demonstrates how the concept of 3 good things on a plate is an excellent and exciting way of cooking and preparing food. The first episode shows how versatile beetroot can be and hugh's challenge for the first week is to make a great dish with beetroot and two other key ingredients. So our recipe is Beetroot Pesto, a fantastic dish that is sweet, creamy, nutty and incredibly fragrant and it can be used in so many different ways, for pasta, bread, soups etc.

We really believe this recipe's a winner and hope that we win the prize, but regardless, we think this is fantastic video and a fantastic recipe!

For more information on Hugh Fearnely-Whittingstall and River Cottage see the link below:


Monday 5 November 2012

Easy and Tasty Wholemeal Bread

So here's our newest bread video, and we think it's our best one yet. This bread is really fantastic, incredibly tasty, incredibly easy and very healthy! A complete joy to make and eat. The two crucial factors for this success are spelt flour and our kitchen aid machine. The organic wholemeal spelt flour we're using is incredible, so tasty, very light and easy to use. It makes for fantastic bread dough and is perfect for beginners. It also has less gluten than normal wheat bread so it might be an interesting option for people who have a gluten intolerance. 

Spelt flour is experiencing a real revival in the last two decades. It's actually a type of grain that was already used by the Romans and it is an incredibly hardy grain, that's why it's so often used in organic agriculture. But the yields are lower than modern wheat varieties so that's why it hasn't been very popular in the last 100 years. Anyway, it's an incredible flour to use and it's an incredible feeling to eat a type of bread that would have been similar to the bread the Romans ate thousands of years ago. We got our flour from Doves Farm in the UK and you can check out their website for more information: 


The second important factor was using our kitchenaid! They aren't the cheapest piece of kit for the kitchen but they make homemade bread a real joy. Instead of kneading the dough by hand for 5-10 minutes, you just let the machine do it for you. Then you can proceed as you normally would, shaping the dough, letting it rise etc. It's such a quick, easy and clean way of preparing your dough for breadmaking.  

We hope you found this video interesting and useful! Thanks for watching!


Sunday 4 November 2012

Real Harry Potter Butterbeer!

Ever wondered how to make butterbeer when reading harry potter? Well you're not alone. Butterbeer has become a hugely popular drink, especially at the harry potter theme parks and there are many butterbeer recipes online that are all variations of this theme park recipe. However, the problem we have with this recipe is that there is no beer in it! It's actually a very uninteresting drink which doesn't taste or feel the way it's described in the harry potter books. But we did find an original recipe of authentic butterbeer as it was used to be made hundreds of years ago. Our recipe is really a form of mulled ale, which is an old tradition in many parts of Europe. Not only did people put the typical christmas spices in their mulled ale, like ginger, cinnamon and clove, but they also used to add eggs, cream, and butter, which of course gives its name to butterbeer. And that is what we did and it makes the mulled ale incredibly creamy and heartwarming, perfect for halloween and christams and the cold and darker days of autumn and winter. And of course for watching Harry Potter movies :)
We hope you enjoy our video!


Saturday 3 November 2012

The Three Sisters Planting Guide


The 'Three Sisters System' is quite well known in the veg growing world. It originated in Latin America and is still used there today as a traditional system of companion planting that benefits each of the three plants, or sisters. The sisters are sweet corn, squash and beans. The idea behind it is that the squash with its big leaves covers the ground and prevents weeds from growing, the beans nurture the soil by extracting nitrogen from the air and releasing it into the ground, and the sweet corn make great climbing poles for the beans. This is companion planting at it's best, the plants nurture each other, reduce weeds and support each other's growth. Traditionally the three crops would have been harvested at around the same time and planting the three crops in the same field also means you get the highest possible yield for the amount of land being used. It is no wonder that this brilliant high-yield but low labour system was invented by peasants whose lives after all depended on the success of their crops.


At Helen's Bay Community Garden we planted the three sisters in our polytunnel. We customised the rules a bit in our case, and that is really what anybody should do when considering the three sisters system. You can use the concept of the system but use slightly different plants, either in the same family or with the same purpose. Instead of using squash or pumpkins we planted different varieties of courgette that are giving us a continuous crop of multi-coloured courgettes every week. Moreover, we planted runner beans, mangetout and french beans in the same row as the sweet corn so that the plants would climb up the corn. These three varities of the legume family will give us a varied crop and they all have different coloured flowers which makes the whole system even prettier. The sweet corn has been planted in rows and the squash is planted in the middle. This gives us one long and very productive bed. The reason we planted the three sisters in the polytunnel was because we started our corn and squash plants a bit late and the added heat and cover of the polytunnel just guarantees a better chance of success, particularly in Northern Ireland where the climate isn't very dependable. 


As you can see in the picture, the beans really do climb up the sweet corn! We did add a few bamboo canes though just to ensure that there is enough space for all the beans and mangetout to climb without cramping each other.

Our verdict is that this system has definitely been a success and that it looks very attractive in a polytunnel. The only thing is it has to be watered regularly, especially in warm weather, for the plants to produce good crops. We will probably try the system again next year, but outisde this time, and we urge everyone to give the three sisters a go!

Thursday 18 October 2012

Make your own bacon!

Like many people, you probably thought that making bacon is really complicated and best left to the professionals. Well actually, preserving meat is extremely easy, however it is a good idea to follow a nice recipe because the flavour of the end product really changes depending on methods and ingredients. Our recipe is a really quick and easy recipe, but it should be said that this technique makes a very particular style of bacon. It's quite thick, and is only left in the cure for 3 hours and thus produces a nice cooking bacon, perfect for dicing or frying as thick slices. The flavour of this bacon is simply fantastic, with a wonderful pork flavour and great aromas from the herbs and spices used in the cure. But this bacon has to be stored in the fridge, and only lasts for around two weeks. It is not a stable farmhouse bacon that dries for weeks and keeps for months. Eventhough our recipes draws out a lot of moisture from the meat, you would have to increase not only the amount of cure but also extend the curing time, to a few days at least, and then the bacon has to dry and age. If you want real authentic pancetta bacon, then you have to use another recipe, but our recipe is a great substitute, as it is incredibly quick and very tasty, perfect for the average home cook :)


Wednesday 17 October 2012

Bread Experiment No.4: Malthouse Grain Bread

Here's another bread experiment. This bread flour is a blend of different grains and malted wheat, giving it a real rustic and deep flavour. Again, I've been very happy with the result of the bread, great flavour and great texture and the dough was quite nice to handle.


Having said that, most of the work was done by our new kitchen aid. A kitchen aid is the true secret to no-knead bread. You can just put all the ingredients in the bowl, put the dough hook on and just leave to mix for 5-10 minutes. The machine does all the hard work for you!


After that the process proceeds as usual: the dough is placed in a clean bowl and covered to rise. When it has doubled in size deflate it, shape it to the form you like, let rise again for half an hour, make a few cuts for prettiness and more importantly to avoid the loaf of splitting in an uncontrolled way. Bake in a hot oven for about 30 minutes, leave to cool, and enjoy warm and delicious homemade bread.


The end result was a very flavourful and rich-tasting loaf, but quite light and not too dense. I can definitely recommend this flour and all other Doves Farm products I've tried so far. Using these types of flour gives you a real authentic experience of bread making and bread tasting! It's the real deal.


A Tour of TheCoolKitchen!

The title says it, this video is about our own kitchen and how we organised everything to suit our needs for daily cooking and food prep. The video is not so much about what we have in our kitchen, but rather to show you interesting ideas and tips on how to organise your own kitchen. After all, if you have a busy kitchen which is used every day and cooking is really important to you then the layout of your kitchen is incredibly vital for your culinary happiness. Your kitchen is the foundation of your cooking, and it is therefore a good idea to have an efficient and well-organised kitchen, but also an aesthetically pleasing one. If you're going to spend so much time in that one place, then make sure you like what you see and you like being there. Overcrowded and messy kitchens are just not a joy to spend time in, so a better kitchen makes for better and happier cooking!

We hope our tips inspire you to organise your kitchen to suit your needs and your likes so that you may become a better and happier cook! Thanks for watching!


Monday 15 October 2012

Traditional Apple Compote by A-C (family recipe)

Try this incredibly easy but tasty French Apple Compote recipe! A-C shares her family recipe which is perfect for this time of the year. Fresh apple compote is so delicious, especially when it's still warm. Yum! And adding the butter at the end is a real good finish to the compote, making it even creamier and richer. Perfect on its own, with yoghurt or spooned over cakes and other pastries...do not miss out on this great food!


Thursday 11 October 2012

Incredible Blue Cheese & Pear Crêpe

The other day AC had just cooked a bunch of fresh crêpes for breakfast and I was wondering what I should put on my crêpes. I opened the fridge to get a bit of inspiration and then saw that there was still some blue goat's cheese left that we had tried out that week. I then remembered that we still had an amazingly ripe pear in our fruit bowl and that pear and stilton are an incredible combination. So why not use this principle with blue goat's cheese and crêpes instead I thought. And here's the result.


All good things are three, and this crêpe combination surely demonstrates the truth of this saying. At first I wasn't too sure if a crêpe with blue goat's cheese and pear would be that amazing, especially for breakfast, but when I had my first taste I knew this was a winner. Incredibly tasty is all I could think of, and that I wanted more! I ate two more crêpes after that first one and they were just as good. Like many people, I like a good savoury crêpe and the combination of sweet and salty flavours. And I have had the opportunity to try quite a few salty crêpe combinations, but this has truely become one of my favourites. The simplicity but the quality of the ingredients is what makes it so incredibly good. You  first need a good creamy blue cheese, a nice stilton would be great as well. Then you have to make sure that you get a nice ripe and juicy pear. And finally, use fresh homemade crêpes, roll together, eat and you're in cheese and pear heaven! So good...


Monday 8 October 2012

Three Sisters Risotto

In our blog section about Helen's Bay Community Garden (More...), I have been explaining what 'The Three Sisters' are and how they work. In short, the three sisters are sweetcorn, squash and beans. When planted together they become a form of companion planting wherein all plants benefit from each other.
The three sisters are also ingredients that work well together in the kitchen. The sweetcorn is incredibly sweet and has a nice bite. The pumpkin/squash is also sweet, and has deep flavour and a creamy texture. And the beans simply taste beany and have good texture!

In our latest YouTube video I'm showing you how to pick these ingredients, and more importantly, how to cook with them by making a fantastically seasonal risotto. Now risotto is always a handy recipe to know that you can customise and make the way you want to and it is simply delicious. It's really easy to make and it's a fantastic meal for this time of the year. So we hope you enjoy this video and that you will try our recipe, and if you have a vegetable garden we recommend planting the three sisters for next year to get a bountiful crop of delicious veg!


Saturday 6 October 2012

Blackberry Jam recipe by A-C

A-C shows how to make incredible blackberry jam! Autumn is a beautiful time of the year and it is also a great time for picking wild berries. Pretty much everybody knows what blackberries look like and they are pretty easy to find as they grow like a weed. So if you want to start foraging your own wild food, blackberries are a great and easy start. And obviously, they make a fantastic jam. What's so nice about homemade jam, especially when it's made from wild ingredients, is that it just tastes like the preserved essence of the fruit, which is not very often the case with most jams you buy in a shop. So we hope you enjoy this recipe and that you will start foraging for wild and yummy food!


Tuesday 21 August 2012

Bread Experiment No.3: Einkorn Pot Bread

This is what the end product looks like! Amazing hearty bread, baked in a pot!


I mostly bake bread by shaping the dough into a loaf and then sliding it onto a hot baking tray in the oven. However, I've been wanting to try the pot technique for a while now and honestly, it's one of the easiest ways to bake bread. If you're somebody who doesn't want to do the whole shaping and proving part of homemade bread, and you just want to get the prep done as quickly as possible then this technique is for you. It is also a good technique to use for certain breads that don't rise as much as others, like soda breads or bread made with wholegrain or wholemeal flour. I used Einkorn Wholgrain flour, which makes a fantastic tasing rustic bread, perfect for soups and stews, and anything else frankly! Einkorn is a wheat variety that apparently outdates any other cultivated wheat variety used today. It's a grain with a lot of history and is speculated to have been developed over 20.000 years ago when humans started cultivating wheat. You could say then that this is the original wheat and when you eat this bread you're experiencing a taste that people experienced thousands of years ago.
For more information on Einkorn flour and the history of bread check out the Doves Farm website:

http://www.dovesfarm.co.uk/about/types-of-grain/einkorn-grain/

The reason I used Einkorn flour was not only because of its strong rustic flavour which compliments the crude but simple pot technique. I mainly used this flour because it doesn't rise as well as other types of flour, and so letting it prove in a pot is a lot easier and straightforward because the pot holds the shape of the loaf. Also, when you bake bread in a pot the crust gets really thick and crispy and this works brilliantly with Einkorn flour.

So how did I make my bread? I first made a sponge using 150 g of Einkorn flour mixed with 350 ml lukewarm water and a teaspoon of dried yeast. The idea behind a sponge is that you use some of the flour for your bread, I usually use 150 g out of 500 g, and then use all of the required water for the recipe and some yeast.


You let this stand in a warm place and cover it with a kitchen cloth for about half an hour. This allows the yeast to get a good headstart and to develop a strong yeasty flavour which works well with wholegrain flour. When the sponge has been fermenting and bubbling as you can see in the picture, add the rest of the flour, another teaspoon of yeast and a heaped teaspoon of salt. The extra yeast will give the dough the needed kick to rise better in the oven. You then just need to kneed the dough for 5 minutes, flour it and shape it into a round ball to put it into an ovenproof pot. The bread was proving for another 30 minutes in the oven at a very low temperature of 50 °C and then I increased the temperature to 220 °C and let it bake for 20 minutes. After that I took the bread out of the pot, put it onto a cooling rack for 10 minutes and then it was time to get stuck in!


Friday 17 August 2012

Bread Experiment No.2: 50/50 White & Wholegrain Spelt Bread

As I've mentioned in an earlier post, I've recently been experimenting with different types of flour and I have really enjoyed using spelt flour for bread. Yesterday I made a 50/50 loaf of half organic white spelt flour and half organic wholegrain spelt flour. Again I've been really impressed with the lightness of spelt flour. The half and half mix I tried was really a perfect dough to work with, not too light, not too heavy, just very easy and enjoyable. Especially for beginners I think this bread dough would be perfect. Here is what the bread looked like when it was finished baking:


I went for a zigzag cut to allow the bread to open and rise nicely in the oven. I like putting big cuts on a bread loaf because I love the open bits that are really crunchy. Although having said that, this loaf was phenomenally crunchy everywhere and the inside was perfectly airy and soft with a good flavour from the wholemeal flour. I will probably try a 100 % wholegrain spelt flour bread next and hopefully make a video soon about spelt flour because it has really become one of my firm favourites. I am urging you to try spelt flour, even if you've never baked bread before, this is the flour to start baking bread with. Yes it is a bit more expensive and not always easy to find but if you're lucky enough to get your hands on some you have to bake bread with it. And then you'll understand what beautiful artisan bread looks, smells and tastes like. 


Wednesday 15 August 2012

Courgette Flower & Ricotta Ravioli


It's summertime, and in the garden that means an abundance of courgettes. At Helen's Bay Community Garden we've planted different varieties of courgette this year, the normal green ones, the striped ones and two yellow varieties. Picking your courgettes when they're still quite young means you get the tastiest and juiciest courgettes, but you also get the flowers which you hardly ever get in any shop. And the flowers are just as good as the courgettes in my book. Their beautiful yellow colour and aromatic scent just symbolise summer for me. And my ravioli recipe really makes good use of these flowers, and the courgettes as well. It's quite a delicate dish with subtle flavours but well worth your time. And once you learn to make your own pasta you can customise this recipe and use spinach, swiss chard or anything else you fancy instead of the courgette flowers. 

Thanks for watching!

Monday 13 August 2012

Bread Experiment No.1: White Spelt Flour Loaf

I've been trying out different types of more unusual flour lately, so basically not your typical wheat flour. There are many different varieties of wheat and many different grains that can be used for making bread, and one such is spelt. Spelt is a very old cousin of modern wheat and was first cultivated 9000 years ago. It's a very hardy grain and that is probably why it was so popular in the past, but with the arrival of more productive wheat varieties spelt started losing its popularity. Until now that is. More and more people are talking about the quality and the flavour of spelt flavour and it's even appeared on tv programms. That's how I heard of it and I thought I would just try it out as I love experimenting with new ingredients.


And I must say I am so impressed with spelt flour. As you can see in the picture, I tried organic white spelt flour from Doves Farm who are a UK based company specialising in unusual and organic types of flour. Doves Farm have a large variety of heritage grain flour available and if you live in the UK and are into breadmaking it is really worth having a look at their website: http://www.dovesfarm.co.uk/
Of course there also other companies and farms that produce and sell special types of flour in the UK, but I have really quite enjoyed trying out different products from Doves Farm. If you're from another part of the world I am sure there also companies and health food stores who specialise in heritage grain flour. Just keep looking, it's worth the effort!

Now that you know where you can source your spelt flour, let's actually talk about this amazing flour. I just did a basic bread loaf yesterday and it was so satisfying to work the dough. It's an incredibly light and elastic dough. It also doesn't need as much water as some types of flour do, as you can tell by my sticky hands.


It's a very easy dough to work with and really doesn't need that long to rise, about half an hour will do for the first rising. Already at this raw state the smell and taste of the dough is quite unique. You could probably make all kinds of bread using this white spelt flour and use it instead of normal strong white bread flour. I'm sure it would be particularly good to use for French baguettes, Ciabatta and nice thin crust pizzas. 

After a second rising I put the bread into a preheated 250 °C oven and again I was impressed how well the bread expands during baking. Just for those who are wondering, yes 250 °C is a high temperature and I only leave it this high for 10 minutes or else the bread might burn and then I turn it down to about 200-220 °C for 20 minutes depending on the bread. And here's the result of my experiment: 


A beautifully risen and baked loaf of bread with an incredible smell that fills the entire house. After 20 minutes of resting we cut into the loaf and it is the softest and fluffiest texture I've ever had in any bread while the crust was so nice and crunchy. Really a perfect balance of soft inside and crunchy outside. And the taste is just so good. I'm normally not a fan of white bread and generally tend to add a bit of wholemeal or other stronger tasting flour into the mix, but spelt flour has enough aroma while being incredibly light that really makes it stand out from regular white bread flour. We tried the bread with just a bit of butter and good quality olive oil and it is really divine. And for breakfast we tried it with different types of jam and spreads like peanut butter, and it works particularly well with cream cheese. It is a perfect breakfast bread really. 

This bread has definitely been a hit and I will be using spelt flour a lot more from now on. I am also looking forward to trying out wholemeal spelt flour in the next few days and I will let you know how that works out. So if you're into breadmaking, or even a complete novice, spelt is the way to go, no doubt about it. 


Saturday 11 August 2012

Easy Ramen Recipe (Video)


A-C shows how to make tasty Japanese Ramen from scratch. Ramen is a noodle soup that originated in China but is immensely popular in Japan. We simply love how quick it is to make and how satisfying it tastes. It is perfect for winter, or whenever you just want to warm up a bit and the taste of the fresh ginger, the garlic and the chilli really gives you a boost! This is really a great asian recipe that is perfectly suited for everyday cooking, all you need is some basic asian ingredients and sauces that you can find in most supermarkets or in asian grocery stores.


Enjoy!

What it's all about

Welcome everybody to our blog!

As you can see for yourself, the blog is called 'TheCoolKitchen and More' because we love food and cooking but we also have many other interests concerning food production, sustainability, nature and crafting. All in all, this blog is really about a lifestyle, 'the good life' you could say, and we want to share our passions and our joys with as many people as possible and hopefully give you the inspiration and the know-how to start growing your own food, to make your own bread, to learn traditional crafts...and the list goes on and on.

So we hope you enjoy this blog and thanks for visiting!